
Children are very fond of making something with their own hands before the New Year, in no case should you deprive them of this joy. In this master class, I will show 10 options for how to make DIY New Year cards with step by step photos. These unique New Year's cards will be a wonderful gift for grandma, grandpa, mom, dad and friends.
Today on the Internet you can find all sorts of congratulatory miniatures, emoticons and incredible masterpieces that can be sent to anyone by e-mail. Even words do not need to be invented, any phrase can simply be copied. But can it be compared with a handmade postcard, will the image on the flickering cold screen of the monitor have such positive energy?
By the New Year 2019, we suggest you make a non-standard postcard with your own hands. It is unusual in that it depicts a cute muzzle of a pig, and the animal is yellow. You should not be surprised at this turn, because a new era is coming, albeit a short one - the year of the yellow pig.
Very soon, good friend a man, a devoted and cheerful dog will be replaced by a wise and generous pig. At all times, this animal was known as an indicator of prosperity; it is not for nothing that even piggy banks are depicted in the form of a pig. We will not depict the entire figure on cardboard, but we will make only her head. The round piece will become the center piece.
What you need to prepare for the craft:
Prepare green (or another color) cardboard for the base, you can cut off the edges roundly. And also knead the yellow plasticine in your hands. Of course, the pig can be made more traditional - pink, but yellow is more suitable for a real symbol.
Press the yellow ball to the center of the cardboard and press firmly with the palm of your hand. Next, press down with your fingers over the entire surface and smooth. Thus, a round cake will appear in front of you, which will subsequently become the head of a pig. You will not only deform the ball to the desired round shape, but also press the main part to the base.

Start turning the cake into the head of the planned animal. For now, use the same yellow plasticine. Attach a small circle to later get a piglet. Make pointed ears and attach from above to the head

Take a thin red strip and stick it under the snout as a smiling mouth. Use pink dots to add cheeks and nostrils.

Add eyes. Pigs are usually depicted as blue-eyed. We can also do this. Use small white and blue dots. Glue our eyebrows above the eyes.

Now you need to decorate your craft so that it really looks like a New Year's one. It is not yet clear why such a copy is shown in front of us. Make a lot of small plasticine beads different color to create garlands.
Bright tinsel sparkles under the ceiling in decorated halls and rooms. We also need to create a similar festive atmosphere.

Collect small balls into thin threads, attach them to the cardboard at the top. Make some colorful stripes.

And one more touch is the inscription "Happy New Year!". It can be written with a marker, but it is better to glue it after completing all the letters from plasticine so as not to disturb the overall ensemble. Paste the words on the top, bottom, or sides, anywhere you like.
Glue also small balls, pressing each with your finger against the cardboard to simulate scattering of confetti. Now we have a real New Year's card, from the canvas of which a smiling and positive muzzle of a symbolic pig looks.

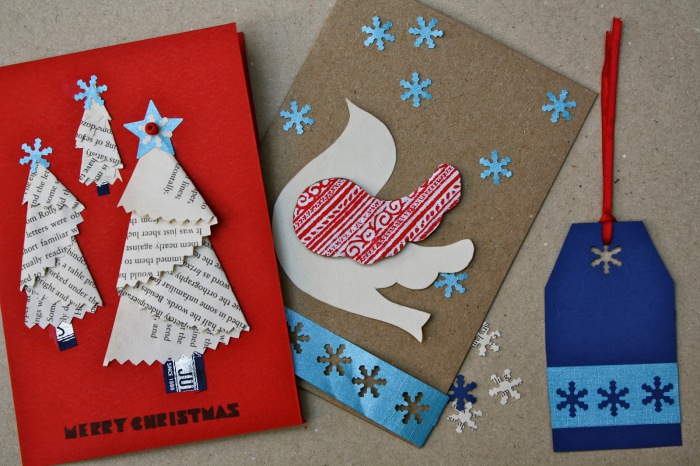
This lesson shows how to make a New Year's greeting card with your own hands with the children. It will be based on cardboard, and the Christmas tree will be depicted in the picture, more precisely, its imitation - a green triangle, decorated with green and white satin ribbon, bright adhesive-backed rhinestones. If you like this version of a New Year's gift, consider what you need to make it, how to make it.

To complete the festive New Year's crafts proposed in this lesson, the following were used:
As you can see, the list of materials includes a lot of items, but there are no exclusive or expensive ones. In addition, some of them can be completely replaced. For example, green and white cardboard will be needed to create a background and a triangular copy of the Christmas tree, but colors may vary.
Corrugated paper strips are needed in order to make a striped bright cover, fabric or ribbons are suitable instead, you can also come up with another Christmas tree decoration together with rhinestones and so on. So, first of all, cut out 2 rectangles from green and white paper, and the size of the second blank should be slightly smaller than the first.

cut into corrugated paper stripes of arbitrary length and width. Cut out some foil stars (or candy wrappers).

Stick the strips on the top layer - white cardboard. Make a fun, vibrant cover by applying stripes along the length. Glue the ends of the strips at the back. Glue the entire structure onto green paper. The background for the postcard is ready.

Add a strip of white lace at the bottom, bringing the ends under the top layer of paper. Cut out a triangle for the Christmas tree from green cardboard.

Wrap a white ribbon randomly around the triangle (glue the ends at the back).

Then add the green ribbon in the same way.

Glue the resulting Christmas tree in the center. Decorate with rhinestones and a bright top. Glue foil stars around the Christmas tree.

On a bright orange paper cutout, write “Happy New Year” with a pen and glue at the bottom - under the lace, add a bow.

A bright handmade congratulation is ready.

3D format is very popular in the modern world. You can apply it to a paper postcard. To do this, you just need to take a few decorative elements and stick them on a white base.

The main decoration will be a paper figurine, for example, an angel. A similar image, suitable for the New Year theme, can be found in any magazine. Cut it out with scissors, and the central part of the craft is ready.
Materials:

Crafting Instructions
Fold a sheet of white paper in half. It can be a regular landscape sheet or cardboard for creativity.

Cut off small pieces of double sided tape. We stick them on a paper base in the place of the alleged location of the angel.

Remove the top protective layer from the pieces of adhesive tape.

Glue the paper figure of an angel on double-sided tape.

Another piece of tape will be needed to attach the snowflake. We glue it on a free area of \u200b\u200bthe sheet.

From ordinary white paper cut out a small snowflake. It should have an empty center. We apply it to the workpiece so that a piece of adhesive tape is in the central hole. Glue a sequin in the form of a snowflake on top. Thus, both snowflakes will be fixed on paper.

With silicone glue, draw abstract stripes on paper.

We lay out sequins of different colors along the strips of glue.

On the remaining empty areas of paper, glue single sequins. We arrange them without a specific system or put them into patterns.

All decorative elements protrude above the surface of the paper. They are convex and have different thicknesses. Thanks to this, the craft as a whole turns out to be voluminous and unusual.

A plasticine flat image of a Christmas ball glued to cardboard will look like a three-dimensional 3D postcard of the New Year theme. Even using plasticine, the ball can be neatly decorated, make an interesting drawing on it, get a unique gift or holiday decor item.
Before buying ready-made postcards in the store, try to make something with your own hands. The plasticine version can be made with the children. You will have a wonderful hand-painted souvenir in your hands.

To create a beautiful New Year's craft with a plasticine pattern, prepare:
It is the bright base in the form of thick cardboard that will set the character of the entire product. A beautiful ball on an expressive background will be favorably emphasized, will not get lost, but will sparkle with new colors, so take the brightest color from the set. For creating new year image in the form of a ball, knead a few pieces of plasticine in your hands.

Knead the selected color in the largest amount in your hands, make a round flat cake. Glue as the body of the Christmas ball on the cardboard. At the top, glue a small loop with which the ball is attached to a spruce branch (it can be made from plasticine of a different color).

Pull a piece of blue plasticine into a thin thread, make small peas from the white mass. All these details will be used to further decorate the ball. An interesting ornament is to be created.

Glue a path of two blue plasticine threads in the center across the body of the ball. Between them, place white balls in a row.

Pierce each small white dot with the tip of a needle or stick to make an interesting visual effect.

Prepare an additional yellow sausage by pressing the segments with your fingers at equal distances from each other, make a zigzag. Glue 2 zigzag strips at the top and bottom. Between the corners, also glue the white balls that are left over from the previous operation.

A beautiful bright yellow bow will also fit perfectly into the overall ensemble. Make a decoration with loops and ponytails, glue the ball itself to the loop.

It is advisable to arrange a large central pattern so that there is still room for a spruce branch at the top. The ball should be suspended from it. Make an oblong green flatbread.
Glue at the top of the picture, adjacent to the top loop. Make needles on the Christmas tree using the same thin stick. Now the product looks really like a living, voluminous application.

After the lesson, you will see that making New Year's gifts with your own hands is much more interesting than just going around the shops in search of ready-made products. And the kids will definitely love this.

You will get an elegant and unusual craft if you buy designer paper and use it for needlework. Today on sale you can find all kinds of materials for creativity: foil, paper in the form of a leather texture, sheets with colored ornaments and much more. And you also need to be prepared for the fact that when creating it, you can use not only paper, but also other materials, for example, ribbons, rhinestones, bright floss threads, chains, and so on.
A simple version of a scrapbooking postcard is presented in this tutorial. What is needed to complete it? This is a limited list, but you can easily expand it.

To create a New Year's card, the following materials are suitable:
Paper Tools:
Plain colored paper or cardboard will also work, but foil and leather-like sheets look very interesting. From the prepared sheets, you need to cut 2 layers of a rectangular shape, and then put them together. Glue the rectangles on top of each other.

Make the foil the bottom layer, the green skin the top. Using a ruler and pencil, draw sketches of rectangles on the sheets, then cut them out along the contour. It is necessary to make sure that the silvery part peeks out from under the green textured one. The size of the rectangle of the bottom layer needs to be made a little larger (with runs on the sides of about 0.5 cm).

Glue the flags on the top green paper. These decor items are often used to decorate halls, houses, shops, apartments for the New Year holidays. Cut out 3 different length flags from colored design paper. Stick the parts hardly, their length will gradually decrease.

Cut a strip from a thin green ribbon of satin texture, the length of which, with small starts, is equal to the width of the upper green rectangle. In the upper part (where the flags are located), glue a smooth satin line. Bring the ends back, after dripping with glue.

In order not to write the inscription "Happy New Year!" on your own, buy a sheet of themed stickers. Take a suitable Velcro sticker and add to the free space. Glue a bow with a pebble to the ribbon.

And the last sparkling touch - rhinestones. If they gradually decrease in size, then in general the craft will look stylish.

If creative inspiration strikes you, then you can easily make beautiful gift anyone close to the New Year. The main thing is to choose materials that will look elegant on their own.


How to make such a craft with a beautiful elegant Christmas tree, see a step-by-step master class.
An interesting handmade postcard will become unusual craft filled with positive energy. Unique products are a gift for any occasion. But still I want to stick to the given topic. For example, if we are talking about the New Year, then it is better to depict some kind of winter ornament or figures suitable for the holiday.
In this master class, a variation of the New Year's card from plasticine with the image of a snowflake is shown. And this snowflake does not have to be white, as we are used to. If we make it green, then it will look very much like a Christmas tree - the central object of a fabulous winter holiday.
Are you interested in this craft? Do you want to repeat this New Year's craft with a plasticine snowflake with your children? This tutorial is here to help everyone. The central object of the application - a snowflake - can be made separately if you wish.

Materials needed for winter creativity:
Since we planned to create a green snowflake - the central element of the card, we need to choose some kind of bright background that blends beautifully with this color. For example, red cardboard is suitable. It just needs to be cut off from a large sheet.
You can also use scrapbook paper with a monotonous, unobtrusive pattern, a white base, or your own hand-painted paper. A green snowflake must be supplemented with some other color, for example, white, in order to create a pattern on the figure.

Soften the green plasticine in your hands, press down on top. You can immediately press the mass with your palm to the surface in the central part. Now the resulting cake needs to be turned into a snowflake.
First, carefully cut out the star with 6 rays. Draw a sketch with the tip of a toothpick to get a smooth and beautiful result. Then cut off all unnecessary along the indicated line, pressing harder.

Using the same tool or stack, make the rays of the snowflake sharper, more carved. Press the plasticine in the right places in the same way.

Make a thin white pattern on the surface of the green blank. Glue a white thin thread along each ray, place the petals in the form of a flower in the center.

Glue a sparkling crystal in the middle, press it tightly into the plasticine. Press down on each petal with a toothpick.


Decorate the rays with small grains, pushing each with a point.

Now write a congratulatory phrase "Happy New Year!". Since the image on the cardboard is plasticine, it is better to make the inscription from thin threads of bright color.

Add a glowing effect by distributing small green segments between the rays.

Postcard "Happy New Year!" ready, it turned out bright and thematic.


In winter, when there is frost and a snowstorm outside the window, you want warmth and comfort. Everything should be warm and cozy at this time of the year, including New Year's crafts. Don't believe? Then we offer you the idea of creating a beautiful New Year's card with a decor in the form of a mitten, which will undoubtedly cheer up those who receive it during the holidays.

To make this “cozy” masterpiece, you need: colored cardboard and colored paper, multi-colored cardboard (you can also use bright paper for gift wrapping instead), bright threads, glue, scissors and a hole punch.

The first step is the foundation. For her, we will use a sheet of white thick cardboard, folded in half. The interior decoration (the so-called "wishes box") is two rectangles of colored paper, slightly smaller than the postcard itself.
We carefully glue them inside the product. On the outer front side, glue a rectangle of cardboard of the same size and shade.


On the reverse side of multi-colored cardboard (or gift wrapping paper) we draw a mitten of the appropriate shape.

We seal its upper edge from the “wrong side” with a strip of cardboard and make a series of holes in it with a hole punch.

To decorate the mittens, we will use threads. First you need to connect the threads from different coils into one and cut into strips of 12-15 cm.


To attach the threads to the mitten, fold the strip in half, thread it through the hole and make a loop. So we decorate all the holes of the mittens.

Lubricate the reverse side of the mitten with glue (we pay special attention to the part where the threads are threaded) and glue it to the front part.

A beautiful postcard with a decor in the form of a mitten is ready. Warmth and comfort in winter days!
New Year's cards have already gone digital for many. They are sent via email or smartphones. But the paper version still retains its unique charm. If you want to surprise the recipient doubly, then it is preferable to make a paper card, like a New Year's gift, with your own hands.
FOLDING CARD "SNOWMAN"
THREE SIMPLE IDEAS
Good afternoon. Today we will make New Year's cards with our own hands. I will show you the most interesting ways and technology. You will not only see photos, but also receive detailed instructions and diagrams for creating each such postcard. I will give you the necessary workshops to illustrate complex techniques (quilling, origami) step by step.
I decided to divide the entire article into 5 parts - on the topics of New Year's cards.

So let's get started...
If you still have old signed New Year's cards, you can no longer re-gift them in the second round. But you can use them to create NEW postcards. From a New Year's card, you can cut a triangle, put it on a leg and get a Christmas tree. The New Year's motif on the postcard turned out by itself - like the colors of the Christmas tree.

Or you can carve a Christmas tree from an ordinary cardboard box - rough corrugated packaging will be in harmony with delicate lace or pearl beads. And you will receive an elegant New Year's card made by yourself.
You can cut out a triangular Christmas tree silhouette with wavy edges and glue it with sequins that imitate Christmas decorations on the tree.
You can give the triangular silhouette of the herringbone a scalloped edge (as in the postcard photo below). And also you can cut out several silhouettes at once and arrange them on one New Year's card.
On the blue New Year's card from the photo below, we see how a three-dimensional lobed Christmas tree is glued together from three triangles.
Or one Christmas tree silhouette can be larger in size and with a different shade of color - we put it as a duplicate background under the top silhouette (as on the right New Year's card from the photo below).

From paper or textile ribbons, you can quickly and easily form a herringbone appliqué.
You can use regular strips of colored paper. Or buy a braid with embroidery in the sewing department of the store. Or, in the gift department of the store, buy a sheet of elegant wrapping paper and cut patterned stripes from it for a Christmas tree appliqué on a New Year's card.
Here in the photo below we see several options for creating such a Christmas tree application.

Paper strips do not have to be glued in a strict order and symmetry. You can cut strips of four lengths - 10 cm, 8 cm, 5 cm, 3 cm. And arrange them in a chaotic oblique order starting from the bottom of 10 cm, in the middle we lay strips of 3 cm and 5 cm, and at the top 3 cm. We crown it all paper star and get a New Year's card with your own hands as in the left photo below.
You can also take a triangle cut out of thick cardboard and glue it with strips of paper or fabric, bending the edges of the strips to the inside of the cardboard triangle. And we will get a ready-made elegant Christmas tree, which you can safely stick on your postcard (right photo below).

But with paper strips, you can do not only planar applications. You can make Christmas trees in three-dimensional technique. Here I give a detailed description of how to make a looped Christmas tree with your own hands on a red New Year's card from the left photo below.

Step 1 - cut strips narrow and long - their lengths will also be different: 2 strips of 15 cm, 2 strips of 12 cm, 2 strips of 9 cm, and one strip of 7 cm.
Step 2 - we make cuts in the front side of the card with a blade - 2 slots on both sides along an imaginary line(the width of each slot is such that our strip can easily fit into it).
Step 3 - push each strip at one end through 2 slots- turn the loop and again return to the same slots. The ends of the strip met at the side glue in the same loop as on the opposite side.
We repeat the same procedure with the rest of the strips. Naturally, it is necessary to arrange the strips from the bottom up in decreasing order (long at the bottom, short at the top).
Or you can cut 6 paper strips of the same length in 12 cm. Bend each strip in half and interlace the folds of the halves with each other cross to cross - in a checkerboard weave. It just looks difficult. But really simple. Here you can tear out a sheet from a notebook and cut 6 strips of any length and practice on such rough material - to see how simple and easy everything really is.
And here is another New Year's card, where Christmas tree is also made of strips of paper. Only here crepe paper is used (with a wrinkled effect) - it is sold in stationery stores in rolls (like wallpaper).

Step 1 - We cut wide strips of different lengths - 12 cm, 10 cm, 8 cm, 6 cm, 4 cm.
Step 2 - On the postcard, we outline tier lines (rounded), to these lines we will glue each tier of our Christmas tree made of paper. We attach a strip of double-sided tape to these drawn lines.
Step 3 - We take the longest strip (12 cm) and fold its entire upper edge into small folds - tucks - and put these tucks on the bottom line of the adhesive tape. We take the next strip in size (10 cm) and do the same. And so we move to the top tier of the Christmas tree. Then we decorate the Christmas tree on the New Year's card for any design at our discretion.
And here is a way to make a Christmas tree on a New Year's card using circles cut out of paper. You can cut out circles of the same size (as in the blue postcard from the photo below). Or you can cut the circles into 4 different sizes - 2 circles for each size. And then the Christmas tree will turn out to be triangular in shape (tapering up) as in the red New Year's card from the photo below.
And here is another technique by which very beautiful DIY New Year cards are obtained. You can make beautiful twists from paper strips.

This is how the process of creating a Christmas tree using the quilling technique looks like. Cutting paper into even strips(It is convenient to do this under the ruler with a paper knife - on a wooden board so as not to cut the table. Or you can buy ready-made quilling strips. Or get a machine for cutting quilling strips.

We lay each twist in the circle of the template(so that the twists are the same size). We allow the tight twist to open up a little, unwind - but within the framework of a round stencil. And then glue the tail-tip of the twist to the barrel of the twist itself. That is, we fix its size. So it will be possible to remove it from the stencil frame and not be afraid that it will unwind and increase its size.
If you don't have a stencil, you can use round caps for creams or drinks. Lay the twist on the bottom of the glass or lid and let it unwind to the diameter of the lid. Then carefully remove with tweezers and fix the twist tail with glue.

We pinch round twists on one side with a finger to give it the shape of a drop.

We add drops of different sizes in pairs - and we get a quick and simple Christmas tree.

Quilling technique allows you to create a variety of Christmas tree models from paper twists.


Or you can cut the paper into wide strips of different lengths - and roll each strip into a roll. It's easy to do if wrap it around a pencil- glue, wait until the glue grabs - and only then remove it from the pencil. From such rolls of different lengths, a beautiful Christmas tree on a postcard is obtained. Quick and easy to do by hand. paper can be used simple color. Or buy sheets gift wrapping paper(sold in the gift section).

Can be used as material to create Christmas tree use any small details. Sliced snowflakes or butterflies. Buttons or origami stars or bolts and nuts (if you are preparing a card for your husband and want to make it brutal).

You can make beautiful lace on a New Year's card. you can use ready-made lace paper napkins(sold in a hardware store, in the same place where cupcake molds are). Such napkins are often placed under cakes and other culinary products).
Or you can create your own paper lace- folding paper as for cutting out a snowflake. And along the folded edge, start up an interesting pattern with holes.
Can you fold the cut-out snowflake itself in the shape of a Christmas tree and stick it on a Christmas card.

But New Year's cards, which are decorated with a Christmas tree folded from a napkin. Such folding origami in the form of a Christmas tree is made quite quickly and from a simple square (nothing needs to be cut out). The main thing is that each upper square should be slightly smaller in size than the lower one. And then the tiers of our Christmas tree will go to the narrower to the top.

Below I have drawn a diagram that illustrates the process of creating paper blanks for a Christmas tree for a postcard.

But you yourself can come up with YOUR interpretations of a modular paper Christmas tree. Come up with your own triangular bends and create your own individual New Year's card with a Christmas tree.


And here is another folding Christmas tree. Everything here is quite simple and is made from a single piece of cardboard. And if you wish, you can additionally decorate the Christmas tree with colored paper and decorations.


And also you can quickly fold an origami paper Christmas tree in such a semicircular pattern. You can copy the shape of the Christmas tree and the fold lines directly from the monitor screen. To zoom in or out on the screen, roll the mouse wheel forward or backward while holding down the Ctrl key.

Or you can make such a Christmas tree yourself without a drawing. And just bending the semicircle back and forth several times, as shown in the figure below.

If such a semicircular scheme for a folding Christmas tree is made not with a smooth edge, but the circumference of the scheme is serrated into soft ruffles or teeth, then the edges of our tiers near the Christmas tree will turn out to be curly, as in the photo of New Year's cards below.

Also for Christmas cards, the carving technique with lapels is suitable. This technique is very easy to do. Part of the picture is cut with a razor blade and folded back. We see the most primitive sample in the right photo below - half of the contours of the Christmas tree and the snowflake are cut off there and simply bent.
You can make a double contour - and then the bend will turn out in the form of a narrow silhouette strip, as is done on the left postcard from the photo below.

And you can cut and bend down each tier silhouette of a Christmas tree on a postcard. And we will get a Christmas card with the photo below.

You can first practice on any draft piece of paper - to make sure how easy it is to actually implement such a postcard carving technique, and make your own unique New Year's craft.
We have considered New Year's cards with a Christmas theme, and now let's look at all the other New Year's stories that you can decorate our postcards with your own hands.
Large applications in the form of Santa Claus will decorate any Christmas card. No need to make a full-length silhouette of Santa Claus somewhere in the corner of a postcard in the form of a small booger. It is better to take the largest size of the hat, beard and take the entire part of the card with these main elements of Santa Claus - a red nose, mustache, beard, hat.

You can fold Santa Claus using the origami technique for a postcard - as shown in the photo below.

And now you can move on to a new character of the Christmas holidays - a snowman. Usually we are used to seeing him on crafts in the form of three white rounds and a bucket on his head. But you can get creative with the task of depicting a snowman on a postcard. For example, make it peeking out from behind the Christmas tree - as in the left photo below.
Or take a ready-made postcard with a snowman - cut it into strips of different lengths - and fold a Christmas tree pyramid out of these strips. Fold in such a way that on some strips a sly snowman's face is visible (as on the left New Year's card from the photo below).

Also, you do not have to applique a snowman on a classic white paper card. You can take a musical staff of a New Year's song on the Internet - put it on print, and cut out round disks from such paper for a snowman appliqué.
Or take a printed text that tells about New Year's traditions and cut circles for a snowman from such text.

You can make a snowman on a postcard from a paper fan. When the fan is bent in half - and its blades unfold in a circle.

You can make a snowman on a postcard using the quilling technique. Twist from white paper strips the twist modules, and fold the quilling snowman.

You can depict a snowman in an interesting unusual angle or setting. It can be a snowman from the TOP VIEW (as in the left photo below) ... or a snowman inside a snow globe (as in the right photo).

You can make an applique of a snowman who pierces a snowflake with his nose. Or a snowman-lord in a top hat and with a red bow around his neck.

It is not necessary to put a bucket on a snowman. The snowman looks good in a neat black hat with a brim, decorated with a sprig of holly.

A snowman on a postcard can be depicted quite schematically. Semicircle, scarf stripe, two beady eyes and an orange triangle nose.

You can make a simplified silhouette of a snowman the side of a two-layer postcard as in the photo below.

Or you can use the entire white background of the card as the body of a snowman. On New Year's cards with a photo below just this principle is shown.

The most difficult thing is to make a three-dimensional 3D postcard with a silhouette of a snowman.

Another New Year's character that looks festive on New Year's cards is a deer.
It can also be portrayed outside the box, but in an interesting situation. For example, it can be a deer singing Christmas carols with inspiration, playing a drum, or skating - it's all up to your imagination.

You can choose the simplest silhouette application ONLY DEER HEADS on postcards.

And you can decorate a New Year's card with the silhouette of a whole deer - from horns to hooves.

You can cut out 2 ordinary stars from paper and fold them on top of each other with an offset of one ray - and we will get an elegant snowflake on a Christmas card with our own hands.

You can make a beautiful snowflake using a voluminous convex technique.

Or embroider a snowflake from threads. That is, apply a symmetrical pattern of punctures. And then, in a certain order, lace these puncture holes with threads to make an openwork snowflake.

You do not have to come up with very complex weaves of threads. Even small thread and needle patterns will decorate your New Year cards.

In this thread technique, you can make not only snowflakes, but also any other New Year's motifs.

And of course a quilling snowflake.

Here in the photo below we see the stages of creating a complex snowflake from ordinary quilling modules - you need to start each snowflake from the center - and increase the petals to the middle - circle by circle.

Your Christmas card with snowflakes can look like a layered cake with all sorts of details mixed in, layering and bumping into each other in an ornate chaos of beauty.

The snowflake on your postcard can be made from origami paper modules.

And here is the theme of festive Christmas wreaths. On a postcard, they can be depicted in any technique. It can be a planar applique of any geometric shape, decorated with ribbons, buttons and other tinsel.

You can make a New Year's card in the form of a door on which such a Christmas wreath hangs.


Quilling technique is also ideal for creating modules for a Christmas wreath.

New Year's cards can decorate birds. They can sing winter songs while sitting on birch musical branches.

Also, New Year's cards can depict a winter window through which you can see either a snowy landscape or a festive room with a Christmas tree.

And here are some more ideas how to give money in a New Year's card . We are accustomed to investing money inside postcards. But you can put money outside, making it part of the general New Year's application. I will now explain how to place the money on the front side of the postcard and not ruin it with glue.

Here on the first postcard we see a bill that was folded in a triangular cone - a ribbon was glued to the postcard (not money, we don’t spoil it with glue) and glued the ribbon so that it sticks to the glue in the middle, and its tails hang freely. We put a Christmas tree-money cone on the ribbon - and tie it, tie it with the free ends of the ribbon.
In the second case we glue the snowman - but we don’t just glue it - but on plump pieces of styrofoam. That is, the snowman turns out towering on the postcard. Thus, the neck of the snowman turns out to be moved away from the canvas of the postcard - and under his neck you can safely slip a banknote folded into a strip.
And in the third case - we roll candles out of paper. We glue them with ribs to the postcard. And in each tube we put a banknote folded into a narrow roll.

These are the original ideas for New Year's cards I found for you this holidays.
Good luck to you New Year's crafts and happy new year.
Olga Klishevskaya, especially for the site ""
If you like our site, you can support the enthusiasm of those who work for you.
Happy New Year to the author of this article, Olga Klishevskaya.
Pre-New Year's mood is quite simple to create, because everything lies in the little things. Try to make wonderful cards for the New Year with your own hands, it's very fun and easy, such an original gift will be appreciated by friends and relatives. We invite you to familiarize yourself with several master classes on creating postcards, turn the proposed ideas into reality.


Necessary materials: 5 squares of colored paper measuring 10 cm; 9 cm; 7.5 cm; 6.5 cm; 5.5 cm.
How to do:


To work, you will need a minimum of material - decorative tape, as well as strips of colored paper.

Manufacturing features:
Manufacturing instructions:

It is necessary to prepare:


You need to prepare:

You will need to prepare:


These photos show how you can keep the kids busy and prepare for the New Year, for this you need to prepare paints and paper or cardboard.

You will need:


From felt, you can make the following design:


Quilling:


Video about creating a scrapbooking postcard:
Origami crafts for postcards:


Even a modest souvenir, accompanied by beautiful postcard handmade would make a great gift. Such a card will not only convey warm wishes, but will also be an excellent home decor. We share ways to make amazing New Year cards easily and simply.

The leftover yarn for knitting can be put into action by making a New Year's card out of them with your own hands. Cut a triangle out of cardboard that will become a Christmas tree, generously grease it with glue and wrap it with colored threads. The more colors of yarn used, the better. Then glue the Christmas tree on a regular postcard and decorate it further if desired.

Pieces of bright fabrics will come in handy for creating a postcard. Choose textiles that will not crumble. Cut out simple figures from fabric - Christmas trees, Christmas balls, animals - and glue them on a white postcard. The contrasting combination of colors looks the most impressive.

Using ribbons in decor is a win-win solution for those who want to create a festive mood. Draw the outlines of a New Year's ball on paper or lay it out with glued beads, and place a bow tied from a narrow ribbon in the upper part. The presence of three-dimensional elements makes the decorative postcard very original.

Twist thin tubes from multi-colored paper. Grease one of the edges with glue so that it does not unfold. Then glue tubes of different lengths onto the postcard. A postcard with a voluminous Christmas tree is ready.

Fans of minimalism will appreciate the discreet but effective postcard, where Christmas tree branches are made from strips of paper. The only decoration of such a postcard is a decorative seam on paper branches and a frame along the edges of its front part.

A card that not only looks great, but also smells good is a really nice surprise. As a basis for a decorative composition, use cinnamon or vanilla sticks, surrounding them with New Year's tinsel, beads, pictures.

White lace becomes snow-covered Christmas tree branches, and sequins glued to it become Christmas balls. For the background, use paper of any pastel shade or textured fabric, such as burlap.

Even a simple drawing on a New Year's card can look impressive. In order for the postcard to look noble, pay special attention to the accuracy of its application. We also recommend using rough craft or snow-white glossy paper.

An easy way to make a postcard voluminous is to sew on any paper shape with one seam running down the center and fold over its edges. You can also use several figures of the same shape, sewing them with a common seam, and gluing one of them as a background. Then the image will be even more voluminous.


Quilling is the art of creating decorative compositions from strips of paper. It will not be possible to fully master it a couple of days before the New Year, but it is quite possible to apply individual techniques in the decor of a postcard. Circles of twisted narrow strips of paper become New Year's balls, and the tree - a green curved line drawn on a postcard.

Another easy way to diversify a familiar application is to use materials with a different texture for it. For example, knitted fabric, cardboard, plain thin paper. Then, despite the simple form of the elements, the postcard will look non-trivial.
It is not at all necessary to use white paper as the basis of the postcard, and make the application bright. Do the opposite, and the decorative composition will sparkle with new colors.

For lettering and drawing, choose a paint that contrasts with the paper base. The more intricate and decorative the inscription is, the better. Don't forget to surround it with small, simple drawings.

A simple landscape applique will be a real decoration for a New Year's card. Complete it with voluminous elements - cotton wool imitating snow, beads, sequins, and even chains. Such a New Year's card with your own hands looks very cozy.

Punch holes on the thick paper of a saturated color along the outline of the triangle. Stretch the threads between them in a chaotic manner. Do not make too many stitches - our New Year's card is valuable for its conciseness.

Draw a Christmas tree on paper and generously grease it with silicone glue. Then add sequins and beads. After drying, a thick thread can be glued along the contour. Such a New Year's card with your own hands will sparkle with all the colors of the rainbow.

The basis for the snowman postcard is white paper folded several times. Grease it a little with glue so that the snowman keeps its shape. From the remnants of the fabric, make a hat and scarf for the snowman, draw his face.

In every house there are many buttons that are no longer needed, but it is a pity to throw them away. On the eve of the New Year holidays, buttons will come in handy. Glued on a postcard, they become Christmas balls. Complete the composition with a simple inscription. Do-it-yourself New Year's card is ready.
When gifts for loved ones are ready, it's time to think about decorating your own home. Do not forget
We invite you to make two New Year's cards with your children. The main theme of these postcards is the Christmas tree.
First, we cut out a postcard from thick white paper. We took drawing paper for the base of the postcard. The size of the folded postcard is 17.5x11 cm. You can choose your sizes. The main thing is that the size of the background for the postcard is 0.5-1 cm smaller.
.jpg)
1. Background template for a postcard
.jpg)
Templates for cutting Christmas trees and Christmas decorations.
.jpg)
2. Cut out Christmas tree elements and Christmas decorations.
.jpg)
3. Paste the background on the postcard.
.jpg)
4. Glue the trunk of the Christmas tree
.jpg)
5. We glue the first tier of the Christmas tree. We coat only the element only up to half, so that the needles are not glued. We bend the needles with our fingers.
.jpg)
6. We glue the second tier of the Christmas tree.
.jpg)
7. Similarly, glue the third (last) tier of the Christmas tree.
.jpg)
8. Glue a star and Christmas decorations to the top.
.jpg)
9. We make out a postcard inside. We take colored paper. And with the help of curly hole punches or curly scissors, we process the edges. We processed the edges with a star-shaped hole punch so that the inside of the card would be New Year's and festive.
.jpg)
10. We sign the postcard.
11. Postcard is ready!
.jpg)
1. Postcard background
.jpg)
Christmas tree and toys templates.
We paste the background on white cardboard - the base (you can choose your own background for the base).
.jpg)
.jpg)
2. Cut out three Christmas trees and stars.
.jpg)
3. We apply glue only on the central fold of the largest Christmas tree from the inside and glue it in the center of our postcard.
.jpg)
.jpg)
5. We should get a Christmas tree, the branches of which can, as it were, “flip through”
.jpg)
6. Glue the stars on the Christmas tree.
.jpg)
7. If desired, you can add your own decorations made of paper, foil, beads, stars. We have added snowflakes. And here's what we got.
.jpg)
Don't forget to sign the postcard. Our card turned out to be large enough, so we can write a few congratulations.
And these are two postcards together.
.jpg)


