
On the eve of the New Year holidays, everyone is waiting for miracles, preparing and trying to keep traditions. The kids are in a hurry to dress up Christmas tree so that Santa Claus comes faster and gives gifts. Recently, handmade crafts have become popular.
Consider master classes on how to make Santa Claus with your own hands from improvised materials. The step-by-step implementation is understandable to children, so they will create with pleasure and joy.
Fabulous Santa Claus, made of felt and fabric, looks like such a cutie! So I want to quickly start creating such a beautiful character.
Materials:


Manufacturing process:
So that the glue does not show through the material, it is recommended to sew the parts together. However, this process will take a long time.
A beautiful big Santa Claus is obtained from plastic bottles. The figurine of grandfather can be put under the Christmas tree.
First you need to take the bottle in your hands and visually determine where the parts of the body will be located: the head, torso, where the beard and belt, cloak should be drawn. The figure should be proportional.

Color the fur coat red, make the belt black, the face beige, and the beard white. After drying, put a sewn cap on your head, attach a mustache and mittens.
Used light bulbs are suitable for creating various Christmas tree toys. To do this, you need to be patient, take a brush and acrylic paints, and start creating.
You need to draw Santa Claus, a deer, a bump or other characters and objects according to your imagination or peep similar drawings in coloring books.


It can also be done in a different way. To work, you need glue and semolina. First you need to coat the light bulb with glue, and then roll it in the groats. After complete drying, paint with paints. You can decorate toys with sparkles, pompoms, rhinestones, beads.
A roll or sleeve from toilet paper or paper napkins will be needed to make a pipe through which Santa Claus descends into the house. The craft turns out so bright that the children are happy to take on its implementation. Moreover, they have a hope that Santa will come down to them to pamper them with gifts, because New Year- a holiday of hopes and miracles.

Materials and tools:
Manufacturing instructions:


A black gift bag can be decorated in a different color, usually it is red. To prevent the gift bag from merging with the pipe, a black strip can be drawn along the edge of the red bag.
Previously, ice cream was sold only with wooden sticks, now a wonderful material for creativity is available in free sale. Adding a little imagination, you can get a beautiful Christmas wall decoration.
From sticks, you can make a simple and complex figure of a character. To make a simple figurine, you will need to take a stick, color it accordingly, draw eyes and glue a beard made of fur or cotton wool.
To make a complex figure of Santa Claus at home, you need to take a few sticks, draw Santa Claus on cardboard. Then glue one stick horizontally - there will be grandfather's eyebrows, and from 5 sticks make a beard. Attach a loop to a horizontal stick, glue a mustache.
Christmas is a delightful holiday for which you want to thoroughly prepare. Santa Claus can be made from an ordinary paper plate. By the way, if someone cannot buy a ready-made one, you can make it yourself from papier-mâché.

Materials:

Manufacturing process:
Wonderful Santa Claus is ready. You can safely celebrate the New Year!
To make a beautiful pendant on the door you will need:

Manufacturing process:
Put on a cap from above - the suspension is ready. Let her protect your home and bring happiness!
The art of origami is a complex but fascinating creative process. Originated a very long time ago. From childhood, we remember how our parents made boats for us, and we let them go along the streams. They also tried to learn this craft.
Over time, more and more complex compositions began to appear that require logical thinking, designed to develop fine motor skills, memory. Therefore, the child must first perform origami toys under the guidance of adults, and then independently.
Materials:
Manufacturing process:
It turned out an interesting cap for decorating a Christmas tree or for Santa Claus. You can glue a cotton pom-pom.
The story is often told to young children that Santa enters the house late at night through a chimney and leaves gifts under the tree. The kids love this story and are looking forward to the evening when Santa brings them gifts.

For manufacturing, you will need thick cardboard for the pipe and soft felt for Santa.
According to the presented templates, you need to cut out a pipe, details for Santa. Which color to choose is up to you. Then you need to glue the pipe, and sew the details of Santa Claus and fill it with padding polyester to make the toy seem huge. Put Santa in the pipe, as if he is going to go down to the house and give souvenirs.
There is nothing complicated. You just need to be able to draw or really want to learn how to do it. On the old keys with acrylic paints, you should draw the face of Santa Claus, a hat. And to make a beard from small rhinestones, you get a brilliant Santa Claus with a beard sparkling like frost.

Cute Santa can be made from paint brushes. It can be hung on a Christmas tree or somewhere in the house in a conspicuous place.
You need to take a brush with a good pile, paint the handle in red with polka dots - this will be a hat. The beard is the pile of the brush, and the metal strip connecting the brush will serve as a face, so you need to stick eyes on it, just below the nose. Above the eyes, make a cool mop of cotton hair, tie it with a ribbon and decorate with a bow or flower arrangement.


Many people celebrate the New Year in a house on a country plot. We offer an idea for creating a festive mood, Santa Claus from a log, who will stand and keep order.
Materials:
Manufacturing process:
On a log, you need to make a cut obliquely - this will be the face of Santa Claus. Then take the paint and draw a beard, eyes, nose, mustache and a red cap. Tie a scarf from a piece of material.
Socks make a creative Santa Claus with the Snow Maiden. Interesting ideas for a school art fair.

Materials:
Manufacturing process:
And so that the long-awaited guests do not catch a cold, you can tie them scarves from strips of socks.
A cotton pad - why not a material for creativity? It is very light and you can make Santa Claus out of it for a Christmas tree or give a beautiful toy to your friends.

Materials:
Manufacturing process:
Everything is extremely simple. First you need to take one disk for the base. From another disk, cut curls for a mustache and a round pompom for a hat. From red paper, cut out a cap and a circle for the nose. All prepared parts are applied to the main disk and glued together.


It turns out an elegant, beautiful toy that can be made with the guys in kindergarten.
After the repair, pieces of plywood remain. They do not need to be thrown away, they will be needed for the New Year's toy Santa Claus.
Materials:
Step by step manufacturing process:
To make the toy, you need to make blanks from plywood in the form of a square, a triangle and an asterisk. There are 2 options for making Santa Claus.
It turned out cute toys from junk material. The first option can be hung on a Christmas tree, and the second one will be heavy, so it can be hung on a wall or above a door.

Unusual, extremely simple and original crafts, such as Santa Claus with his own hands from improvised materials, are intended not only for decorating a Christmas tree or a room for the New Year and Christmas.
Performing them, children acquire the skills and abilities to work with various materials, they develop thinking, creative imagination, fine motor skills, which is of no small importance in preparing a child for school, and the kids get great pleasure from work - this is perhaps the most important aspect to enable the child to turn their ideas into reality.
The most fabulous and fun holiday is approaching - the New Year. On this holiday, the kind wizard Santa Claus comes to us, who fulfills the most cherished desires. How to make Santa Claus with your own hands?
There are so many ways to make Santa Claus that you can list them until the very Christmas holidays. Therefore, we bring to your attention only some ideas that can become the basis for creating new images.
The most classic material for children's crafts is plasticine. To make a craft using the technique of plasticineography or drawing with plasticine, we put a background of plasticine on a cardboard base.

We attach a fur coat of Santa Claus from red plasticine.

From plasticine we sculpt and fix the grandfather's head in its place.


We make a cap and hair: wrap a piece of synthetic winterizer with red chenille wire, give it a spiral shape, decorate the tip with a white pompom.

Glue on the pompom nose. We make a belt from a black lace, and a buckle from a tin can opener.

For crafts, we need: a cardboard roll, fabric, cotton wool, glue, scissors, a button, red beads and factory eyes. We wrap the sleeve with a red cloth, immediately form a cap from it. We make a face out of cotton.

Glue on the eyes. We make cheeks and a nose from red beads. It remains only to attach the pompom to the cap and decorate the grandfather's suit with buttons.

You can make a three-dimensional figurine from a wine cork. We paint half of it with red paint.

Cut out a circle from felt.

We cut the circle into three sectors.

We make a cap out of felt, immediately gluing a loop to it.

Glue the cap to the cork.

We draw eyes and a nose. We glue Santa Claus's beard. We make an edge of cotton wool on the cap.

Santa Claus from traffic jams - ready!

A very cute New Year Santa Claus pendant is obtained from a painted cone.

Santa Claus, made from a child's hand, will leave a touching memory of a small child's hand. For crafts, we need to make salty dough, which we roll into a layer of medium thickness. We attach the pen and cut out the contours of the palm with a stack. We make a hole in the upper part. We put the blanks in the oven so that they dry and harden.

After the blanks have dried, paint them white.

Then we draw a face and a cap for Santa Claus. We cover the craft with a colorless varnish. We give Santa Claus to dry and tie a beautiful ribbon. The original salt dough pendant is ready!

Santa Claus turns out interesting from disposable wooden spatulas or ice cream sticks.

We glue them in a row.

We cover the sticks with white paint.

We decorate the face with cardboard eyes and a nose, we make a beard from cotton balls. We glue the cap from red cardboard, decorate it with a cotton pom-pom.

Santa Claus from ice cream sticks - ready!

You can make crafts from one stick.

We color it in red, leaving free space - this will be the face. We decorate the face with a cotton beard and an edge for a cap, glue toy eyes.

The costume is complemented with buttons. Kids can do this too.

The original craft is obtained from a disposable plate, which turns into the body of Santa Claus.

For greater resemblance to the plate, we glue a felt belt with a large buckle.

From cardboard cut out a circle - the head.

We decorate it with a cardboard cap and toy eyes.


We make a beard and fur from decorative shavings. From felt we cut out felt boots, from cardboard - hands. We connect the parts - and the craft is ready.

Such Santa Claus may well be made with his own hands. Sew or glue light beige felt to the red part - the face of Santa Claus. We fix two red blanks with pins, then sew them together along the edge. Leave a small hole. We fill the craft
We glue the beard, mustache and the edge of the white felt hat to the craft.

Sew beads on the eyes and nose. We decorate the craft with decorative elements. If you sew a ribbon to Santa's cap, you can make a charming Christmas tree decoration out of it.

Santa Claus for the New Year can be drawn. To begin with, we make a pencil drawing according to the model.

Wet the surface of the sheet. Paint blue background with watercolors. Due to the fact that the sheet will be wet, we will get very interesting stains on the sheet. You can sprinkle the background with salt, it will make the background seem to be covered with small dots - snowflakes. After the picture dries, the excess salt will need to be removed.
 We paint the face with beige and pink paint. We circle the facial features and elements of the drawing Santa Claus - gouache drawing


These different Santa Clauses can play the role of one of the main characters of the most magical holiday of the year.
Good day everyone, today we will surprise you with new ideas for New Year's crafts in the form of Santa Claus. There will be a lot of non-standard New Year's resolutions - Santa Claus will appear before us in a variety of ways. We will see that New Year's Santa Claus is not only a paper craft, we will make it from wood, fabric, and boxes. You will definitely find a craft here that will inspire you to be creative, and you will want to make it yourself.
It is known to children of all countries that the main supplier of sweets on New Year's holidays is Santa Claus. We always expect sweet treats from him. And that means crafts with Santa Claus only when New Year's, when it smells of chocolate or tangerines.
Here is an idea for a sweet Christmas craft with Santa Claus. Santa Claus's belly is a sheet folded in half and in the front half of the fold we will cut a hole - a viewing hole where our candy will protrude.

The shape and design of the tummy can be different - triangular (as in the photo above) or round (as in the photo below). The main thing is the general principle - we bend the sheet in half and draw an oval for the hole in the front.
The two edges of the bent part are fixed along the upper edge with a stapler or tape or glue. And then New Year's Santa Claus gets a face, hat, beard, arms and legs.

Your craft with Santa Claus can hide the treat in another way. Here is another version of crafts with a pocket for sweets FLAT New Year's Santa Claus, made of cardboard.

Or here are options with a convex box, where Santa Claus can be poured a good handful of sweets. Such Santa Clauses are a great craft for kindergarten - it is very simple. We have a diagram of this craft and a master class on our website - here in this article

You can just lean against a flat craft with Santa Claus cut box of tea or biscuits- glue it with a colored appliqué imitating a brick pipe.

Here is a beautiful and very simple craft for children at school or in kindergarten. We take a red plastic cup as a basis. From paper we cut out a face, a ford and a hat. Glue this to the top of the glass. You can use a stand behind Santa Claus's head, a support - which is glued to the bottom of the glass and leans against the back of Grandfather's head.

If you have white disposable cups and styrofoam balls - you can make a beautiful ANGEL craft. But if you don't have styrofoam balls, you can make them a SUBSTITUTE - from plasticine we roll a ball, a little more. We tear the white napkin into pieces. We smear the plasticine ball with PVA glue and put a napkin on it, layer by layer ... until all the plasticine is hidden and the ball turns white. Here you have the head of an angel - simple and fast enough. We are waiting for the napkin layer to dry and draw eyes on it or glue them from colored paper.

A triangular gift box can be designed in the form of Santa Claus. Such a box opens in its lower part - at the bottom. Or the box can open like a tulip bud - the triangular walls fall apart and we see the gift.


New Year's Santa Claus
FROM A SLEEVE-ROL.
From the used toilet paper there is a cardboard roll - the sleeve. From such bushings you can make beautiful New Year's crafts. Santa Clauses are overgrown with a cotton beard, they are covered with sparkles, or wrapped in felt clothes. For them, you can invent friends, also from bushings.


The bushings can be painted, or glued with colored paper. Decorate with rhinestones, buttons, wrap with elegant ribbons or ropes.

If the sleeve is shortened twice, cut it in half. That short cut of the roll can become a New Year's pendant with Santa Claus to decorate the Christmas tree.

If you need a beautiful bright craft for an exhibition in Kindergarten, or competitive work for school - then you can quickly and easily do New Year's wreath with Santa Claus from a cardboard ring.
We take a large piece of cardboard - a pizza lid, for example - put a round plate on it, circle it with a pencil. Cut out the resulting circle. We put a small plate on this circle - circle it and cut it out - we get a circle with a hole in the center - that is, a CARDBOARD RING.
We glue it with colored paper (to hide the letters from the pizza) and decorate it with a New Year's application - Santa Claus and flowers. Templates for this craft can be found in the article.

Suitable for kindergarten easy plate craft - New Year's Santa Claus with treats. Cookies and gingerbread on a plate may not be real, but cut out of cardboard or felt, but rather molded from salt dough.

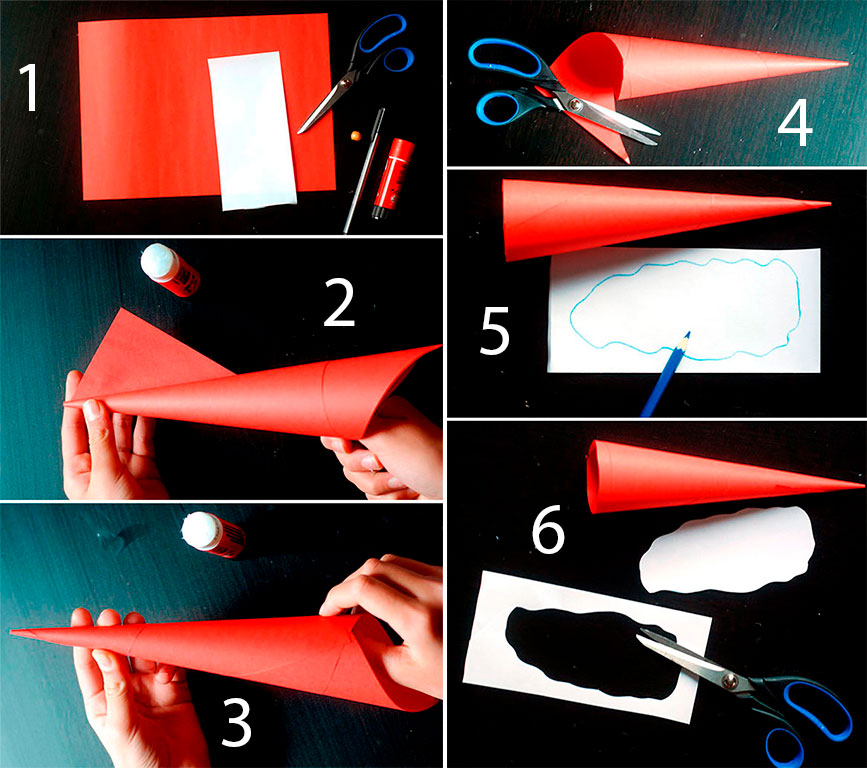
Here is another quick craft where New Year's Santa Claus is made from a cone. In order for the craft to turn out to be high and large-scale, we take four sheets of paper and glue them together along the edge (with adhesive tape or glue stick). From such an enlarged sheet we fold the cul-cone - we level-cut off its lower edge. From the front of the cone at the top we glue the silhouette of the face of Santa Claus, a pompom on a hat, hands with cuffs. On a fur coat we draw buttons and snowflakes.

You can make a FLAT cardboard craft with Santa Claus and so that it stands VERTICALLY at the exhibition, Let's make a selection for it, a cardboard pyramid with a slit. The diagram below shows the principle of gluing such a support from a strip of cardboard.


Below in the photo we see a whole team of New Year's Santa Clauses on just such legs-collections, made according to the scheme above.

Very beautiful and strong crafts for the new year are made of wood. New Year's Santa Claus made of wood is a durable and elegant craft that will serve you, your children and your grandchildren. If you have boards, and you know how to saw and grind, then this is your craft. Let your New Year's Santa Claus be wooden, warm and pleasant to the touch. A tree always retains the living force of nature.

From wood, you can also cut out the silhouettes of Christmas trees, the silhouette of a snow-covered house and other elements of the winter landscape.

You can cut out Santa Claus, who is holding a sign with a New Year's wish in his hands.

You decide what the shape of Santa Claus will be - elongated high, or plump and low.

With wooden Santa Claus, you can make New Year's compositions by adding other wooden characters to it.


You can buy ready-made wooden figurines with Santa Claus and decorate New Year's compositions from them. Just create a piece of New Year's decorations - from spruce branches, artificial snow.

For such compositions, you can make Christmas trees - from cones cut off from an egg box.

You can fold paper Christmas trees as in the photo below. For this, in the New Year section, there is also a large article about DIY paper Christmas trees.

If you cover the wine bottles with red spray paint, you will get an excellent blank for crafting New Year's Santa Claus. Note: choose a color marked GLOSS because matte will look dull and you will need to varnish the craft.

If you are fond of thermomosaic crafts, then you can fold a craft for a Christmas tree from mosaic bugs.


Here is a beautiful panel in the form of Santa Claus. This elegant New Year's craft is made from a special decorative ribbon, which is assembled into wavy ruffles. But we can make a similar craft without a ribbon - just using the very idea of \u200b\u200bthe round design and fluffy decor. You can make an imitation of beard curls from ordinary office paper, from yarn, cotton wool. If you make crafts not large - but small from a plate, then it is good to make a beard from round cotton pads.

New Year's Santa Claus
ON PACKAGING for gifts.
From dense felt or flexible formiam, you can fold the gift wrapping yourself.

Below, I drew a figurative diagram of this New Year's box with Santa Claus - so you can see that everything is simple. There is a bottom (narrow rectangular) - there are rounded walls and sidewalls, with zones for gluing them to the front and back sides of the bag-box.

You can use this principle to create your own designs of boxes with Santa Claus. The pattern is the same, but the styles are different. In the photo below, THE SAME SCHEME ... but here the front and back walls already have a ready-made silhouette of Santa Claus. The diagram in the picture below is cropped - you need to continue it down (mirror from the top), and to the sides (lengthening the sidewalls).

But first, you will learn how to make simple rectangular boxes with straight walls and simply decorate them with an appliqué with New Year's Santa Claus.

Here's another beautiful craft, where New Year's Santa Claus is made from a lacy paper napkin, on which cakes are placed. The face of Santa Claus is cut out of white paper tinted in beige. Such an application can also decorate your New Year's gift box.

And here are examples and diagrams of SQUARE BOXES with Santa Claus - new year designs may be very different.


Beautifully look Santa Claus crocheted. Here you can fantasize as you like. Make them long, tall or round thick. You yourself set the shape of the figurine of red yarn - and then attach it to the face, beard and it becomes a typical Santa Claus.


You can felt New Year's Santa Claus from felt - combed wool. Felting is like modeling with plasticine, only with constant combing of your figures. we scratch with a needle until the lump is compacted under our hands.


Here are such beautiful ideas with New Year's Santa Claus you can implement this New Year. I wish you creative insights, happy coincidences, complaisance of working material and dexterous hands. May you succeed both with crafts and with life in this new year.
Olga Klishevskaya, especially for the site ""
If you like our site, you can support the enthusiasm of those who work for you.
Happy New Year to the author of this article, Olga Klishevskaya.
The favorite holiday is approaching - New Year. I want to create a fabulous atmosphere and a festive atmosphere, and creative crafts will help us with this. In this article we will look at: how to make Santa Claus and Santa Claus with your own hands.
You will need: foam ball with a diameter of 6 cm, faux fur, shabrak, bias binding, holofiber, hemispheres for the eyes, pattern, snowflake sequins, sewing machine, iron with a sleeve block, scissors, textile glue, blue crepe satin, fleece white, nude and blue, stick for the staff, silver braid.


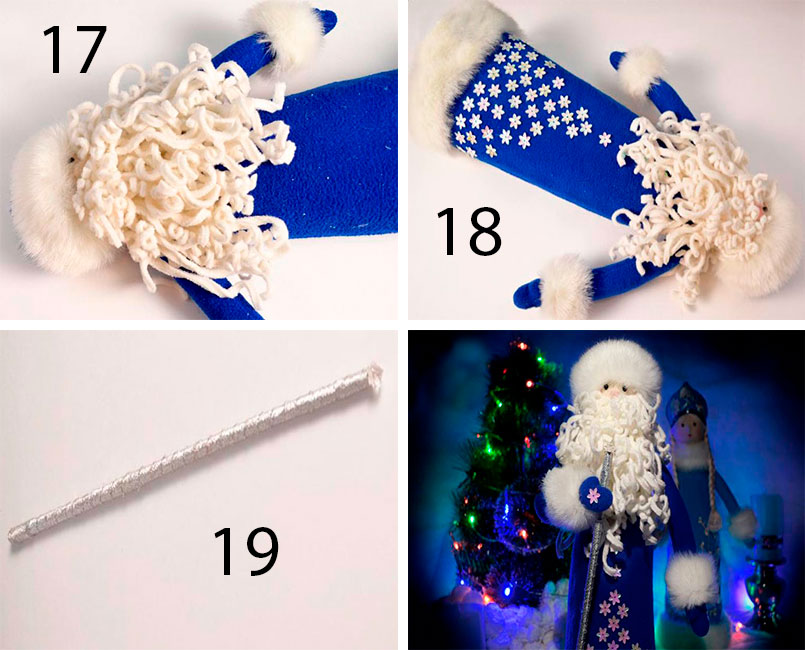
Gorgeous Santa Claus is ready!
You will need: red napkin, template, marker, glue, scissors, paper, printer, hole punch, twine.

Napkin Santa Claus is ready!
You will need: cotton wool, ice cream sticks, red felt, decorative eyes, red pompom, glue gun, flesh-colored paint, brush, scissors.

Santa Claus from cotton wool is ready!
You will need: felt 1 mm thick in beige, white and black, white felt 3 mm thick, thick beige cotton fabric, white felting wool, synthetic winterizer, wire, template, black beads for the eyes, threads in black and beige, scissors, pencil, glue gun, small bell and other decorations.


You will need: a bottle of champagne, a hook, a yarn, a centimeter, an edge, a filler, ordinary threads, a needle, doll strands, glue, jewelry.


You will need: red cardboard, flesh-colored paper, 2 lace napkins, scissors, marker, pencil, glue.

Santa Claus from an openwork napkin is ready!
You will need: bright and flesh-colored cotton fabric, white and red fleece, felt, synthetic winterizer or holofiber, combed tape (wool for felting), foam rubber, felting needle, thick and thin wire, glue gun, Moment-Crystal glue, thick cardboard, acrylic paints and brushes, wire cutters, pliers, stationery knife, buttons, beads, beads, floss threads.


You will need: colored paper red and white, scissors, glue, marker, pencil, wooden bead.
You will need: paper plate, colored paper, scissors, glue, marker, printer, eyes, hole punch, rope.

You will need: box, colored paper, scissors, glue, marker, pencil, button, elastic band, envelope.

You will need: plastic bottle, paints, colored paper, pompom, scissors, buttons, 2 sleeves, glue, cotton wool, white and black lace.

Santa Claus from the bottle is ready!
You will need: white and red paper, scissors, template, printer, pencils or felt-tip pens.

Creative grandfather is ready!
You will need: cotton pads, plastic spoon, glue, red yarn, buttons for eyes, ribbon or thread for hanging, red felt-tip pen, scissors.


It’s not the first year, before the New Year holidays, my child and I have been making Christmas toys from cotton wool. This material for children's crafts is convenient, affordable and safe. This time we made a Santa Claus wizard so that ours would not be bored.
1 . Pour one tablespoon of cold water into a bowl. We fall asleep 0.5 tablespoon of potato starch.
 2
. Stir until dissolved.
2
. Stir until dissolved.
 3
. Gradually pour 1 cup of boiling water into the resulting mixture, constantly stirring the potato paste. Leave for 15 minutes for the glue to cool to room temperature.
3
. Gradually pour 1 cup of boiling water into the resulting mixture, constantly stirring the potato paste. Leave for 15 minutes for the glue to cool to room temperature.
 4
. Pierce a plastic bottle of yogurt (this is easily done with ordinary scissors), making holes at the same level on both sides for a plastic tube, which will then be pulled through. Leave segments of the same length on both sides - this is a blank for the hands of Santa Claus.
4
. Pierce a plastic bottle of yogurt (this is easily done with ordinary scissors), making holes at the same level on both sides for a plastic tube, which will then be pulled through. Leave segments of the same length on both sides - this is a blank for the hands of Santa Claus.
 5
. In the lid, you need to make two holes and thread a piece of a beautiful ribbon through them. Tie a knot on the inside of the lid.
5
. In the lid, you need to make two holes and thread a piece of a beautiful ribbon through them. Tie a knot on the inside of the lid.
 6
. Remove the wrapper from the chocolate Santa Claus. Cut out the face piece. Attach an image to the bottle. Secure the top edge by screwing the foil on with a lid.
6
. Remove the wrapper from the chocolate Santa Claus. Cut out the face piece. Attach an image to the bottle. Secure the top edge by screwing the foil on with a lid.
 7
. Now we begin to “sheath” our Santa Claus with cotton wool. We tear off thin, long cotton rags, moisten them abundantly in starch jelly and put them on the bottle, without touching the area with the image of the face. The ends of the flaps should lie crosswise. When you wrap Father Frost's hands with cotton wool, try to ensure that the ends of the flaps end not on the palms, but on the torso.
7
. Now we begin to “sheath” our Santa Claus with cotton wool. We tear off thin, long cotton rags, moisten them abundantly in starch jelly and put them on the bottle, without touching the area with the image of the face. The ends of the flaps should lie crosswise. When you wrap Father Frost's hands with cotton wool, try to ensure that the ends of the flaps end not on the palms, but on the torso.
 8
. Thus, we gradually make a fur coat, beard, hat, hands. To make the beard lush, just put a few flaps (not one thick one, but several thin ones on top of each other, from different trajectories). Wet cotton wool abundantly!
8
. Thus, we gradually make a fur coat, beard, hat, hands. To make the beard lush, just put a few flaps (not one thick one, but several thin ones on top of each other, from different trajectories). Wet cotton wool abundantly!
 9
. While the starch jelly is wet, you can attach various accessories to it, such as sequins, light braid, sparkles. If, after drying, some of the jewelry falls off, it can be fixed with a glue gun or thread.
9
. While the starch jelly is wet, you can attach various accessories to it, such as sequins, light braid, sparkles. If, after drying, some of the jewelry falls off, it can be fixed with a glue gun or thread.
 10
. The finished craft should be left to dry at room temperature. Do not put Santa Claus on a window or radiator, the cotton wool will turn yellow and the external festive look will deteriorate. It will take at least a day to dry completely. Santa Claus will significantly lose weight and the Christmas tree toy will become light, suitable for decorating a festive tree.
10
. The finished craft should be left to dry at room temperature. Do not put Santa Claus on a window or radiator, the cotton wool will turn yellow and the external festive look will deteriorate. It will take at least a day to dry completely. Santa Claus will significantly lose weight and the Christmas tree toy will become light, suitable for decorating a festive tree.

Are you preparing crafts for kindergarten for the New Year? An excellent solution would be to make a magical grandfather from cotton pads. By the way, in the course of work, you can discreetly and unobtrusively find out what gift the child is waiting for for the New Year.
For crafts you will need:
disposable plate;
cotton pads;
red colored paper;
half of a kinder egg case;
shifty eyes;
PVA glue, scissors, a simple pencil.
Start with a Santa hat. Cut out a half circle from red paper. You can use a disposable plate as a stencil. Let the child try to independently cut the part along the contour. Glue the hat to the plate. Decorate the edge of the cap with halves of cotton pads. Make a pom-pom out of the whole disk.
For the nose, take a half of a kinder egg case and carefully wrap it with red paper. Try to make as few folds as possible. Glue the paper and attach the red nose in the right place. Glue on the eyes.
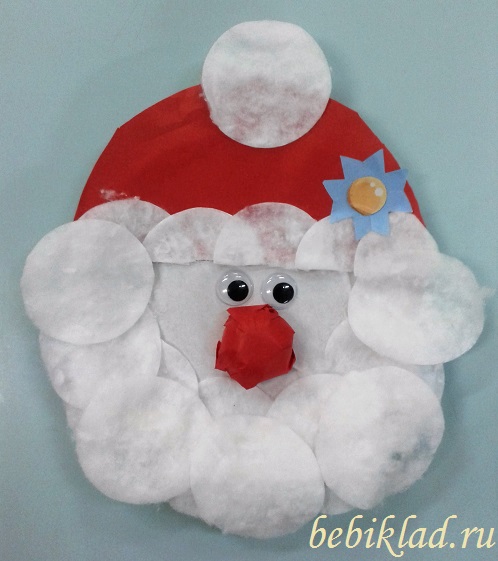
Divide the cotton pads into two parts. By the way, this is a great exercise for the development of fine motor skills of the child. Glue the discs so that the fleecy (inner) side is on top. After all, Santa Claus has a fluffy beard. Make sure that the circles are located exactly, along the circumference of the plate. For volume, you can make several layers.
Glue a paper snowflake, Christmas star, brooch, or other decoration onto the hat. Dream up. This will give personality to the craft.
If you glue a loop on the back side, you get a Christmas tree toy or just a New Year's decoration. The craft will become an interesting gift if you write on the free side New Year's greetings. From disposable plates and cotton pads, you can make a Snow Maiden and other fairy-tale characters. Perhaps you will have actors for the real New Year's performance. It's great to create with kids!
It may seem that New Year's celebration existed at all times. Moreover, it is in this form as it is now - a fun winter vacation with decorated Christmas trees, children's round dances, the beautiful Snow Maiden and, of course, Santa Claus. However, this was not always the case.
In Russia, the arrival of the new year was celebrated either in spring or in autumn, and no one ever decorated a Christmas tree. Peter the Great tried to get people to celebrate the arrival of the next year on the first day of January just over three hundred years ago. True, the glorious tradition was not immediately entrenched. And if in Germany Christmas trees appeared a long time ago, then in Russian cities - only by the middle of the nineteenth century. In village houses, the new custom took root for decades.
The character, without which the modern New Year is unthinkable, did not exist at all. The image of Santa Claus was outlined somewhere at the beginning of the twentieth century. By this time, Zimnik with its cold and snowfalls, and the harsh Frost-voivode, and the perky Morozko, and foreign Santa Claus were known, but our favorite hero was not.
Some researchers are inclined to believe that the Russian Father Frost was borrowed from European culture, and St. Nicholas is his prototype. Others are sure that this New Year's hero was invented precisely by the Russian people. In any case, by the beginning of the last century, the purpose and image of this character was finally formed. His character was also determined: a handsome and kind grandfather, at the same time strict and fair, inspiring confidence and able to fulfill innermost desires.
In pre-revolutionary Russia, both Santa Claus and a decorated Christmas tree symbolized well-known biblical events. The tree was dressed up for Christmas, the golden star of Bethlehem served as the main decoration, and the kind Santa Claus gave gifts to children for the holiday. In those days, our character was not particularly popular.
The revolution and wars postponed all kinds of celebrations “for later”, and the anti-religious campaign launched in 1927 completely canceled everything related to Christmas. In 1935, with the personal permission of Comrade Stalin, the government returned everything to Soviet citizens at once: the holiday, the Christmas tree, and Santa Claus. True, the new winter holiday symbolized only the arrival of the calendar year, and its original meaning was lost.
Santa Claus has become one of the main symbols of the New Year celebrations. Now he has loyal assistants: a cheerful and beautiful granddaughter Snegurochka, as well as a snowman, always ready to help out in difficult situations. Over time, our character also acquired personal transport: a traditional Russian troika harnessed to a painted wagon or wide sleigh.
The order of Santa Claus and the Snow Maiden at home was already possible in those years. Thousands of Soviet children carefully prepared for an exciting meeting, learning songs and poems.
The nationwide recognition and respect won by our hero in the Soviet country survived even after the collapse of the state. In Russia, the New Year (including the old one) and Christmas are loved and expected, a large country begins to prepare for the celebrations almost from mid-November. Not a single New Year's event is complete without a kind, fair and generous magician, whether it be the Kremlin Christmas trees or office corporate parties.
The New Year's character is also used for pedagogical purposes: every child knows that a gift from an attentive and fair Santa Claus can only be received in case of good study and decent behavior during the year. However, on wonderful holidays, all children receive gifts from a good grandfather - both obedient and not very.
The main residence of our hero is located in Veliky Ustyug, in the Vologda region. There, Santa Claus rests, receives guests, answers letters, and on November 18 celebrates his birthday.
For many Russians, the annual meeting with their favorite New Year's heroes is another opportunity to return to a serene childhood and believe in all that is good.


